


Job Application Tracker Spreadsheet: Google Sheets Template
Free job application tracker templates
Key takeaways
- A tracker spreadsheet is only worth holding onto if it's still correct by week six, which is a problem with data entry, not the template.
- Eight of the sixteen columns encompass just about all of the real decisions you make in a search. Everything after that is usually the first to get thrown out.
- The link column is the one you skip over and regret, because a position offering can be gone before you even get a reply.
- If the rows are entered for you on clicking Apply, then the integrity of the spreadsheet remains intact without discipline.
Most people start a job search with a spreadsheet and abandon it somewhere around application thirty. Not because the spreadsheet was wrong, but because filling it in is a small tax charged at the exact moment you least want to pay it: you have just finished a twenty-minute application, you are tired of your own work history, and the last thing you want is to retype the company name into a second window. So you skip one. Then five. A month later the sheet says twenty-two applications and your inbox says sixty, and you have no idea which is real.
So the relevant question isn't "what's the perfect job application tracker spreadsheet template." Whatever design you choose, everything is working fine on day one. The real questions are which columns remain worth having at week six, and how those rows get inserted into the process.
What the spreadsheet is actually for
A tracker is there to answer those four questions you will genuinely have, usually at an inopportune time:
- Had I ever applied here? Asked when the "similar role" pops up in a job board with a slight variation in job title, two weeks on.
- What did I apply for, exactly? Asked when you get a call from a recruiter about a job posting you don't remember, for a company you applied to four times.
- Who has gone quiet? Asked on a Sunday night when you are trying to remember who you need to follow up with.
- Are any of these working? Asked whenever you want to understand if it's the CV, your targeting, or just sheer volume.
Any column that answers one of those stays. Any column that doesn't is icing you'll cease keeping, and a sheet you're not maintaining is worse than no sheet, because you'll rely on it.
The columns that earn their place
| Column | Why it is there | What goes in it |
|---|---|---|
| Date Applied | Turns "they have gone quiet" into an actual date | The date you submitted the file (not the date you found it) |
| Company | The real name you look them up by later | The legal or brand name, spelled one consistent way |
| Job Title | Discriminates between multiple applications to the same employer | The title as it appeared in the original job posting, not as it is paraphrased by the applicant |
| Location | Used to address remote, hybrid, and visa matters later | City, or remote |
| Work Mode | Separates "remote" the label from "remote" the reality | Remote, Hybrid, Onsite or Unknown |
| Salary Currency | Keeps a $ figure from silently becoming a € figure in your head | The currency the posting provided, if applicable |
| Salary From | Anchors the low end of the number when a recruiter asks first | Whatever was in the job posting, blank if nothing was listed |
| Salary To | Indicates the upper salary limit, separate from the lower limit | Follows the same rule as Salary From |
| Status | The only column you will use for filtering | A short, fixed list, as shown below |
| Job URL | The postings get removed, sometimes even before you find out | The post link |
| Job Description | The ad may disappear, but you should keep your own record | Save the full text so you can still tailor a follow-up months later |
| Notes | The referral, the recruiter's name, what you promised to send | One line, not a journal |
| Date Modified | Flags a row that has become stale in an easy way | The last time there was a change to any part of this row |
| Linkedin URL | Ties a LinkedIn "Apply" hand-off back to the employer's own form | The LinkedIn posting link, when that is where you started |
| Interviews | A number, not just a status, of how far a role truly got | How many emails or contact points at the interview stage that row has had |
| Last Status Email | Saves you going back to your inbox to find the email that changed everything | A link to the latest email that updated Status |
Salary is worth a mention. People leave it out because most listings leave it out, and then a hiring manager starts with "what are you looking for" and you are negotiating from memory. Write down whatever the listing did say, even if that is a wide range. It gives you something to point to.
Set it up in four steps
1. Decide where it lives before you design it
A spreadsheet in your Google Drive is better than a tracker on a job board, for a boring reason: two years from now you will be able to see it, download it, and share a filtered view with someone helping you. A job tracker within a product account lives and dies with that account.
2. Fix your status values on day one
Free-text status is where your trackers are most likely to be killed, since "waiting", "no reply yet" and "ghosted?" all mean the same thing, and none of them filter. Choose a small set of statuses, and keep it stable while you search. Something like: Skipped, Bookmarked, Not Applied, Applied, Interviewing, Rejected, Offer. Seven choices is more than enough, and every one corresponds to a different decision.
3. Add one derived column, not six
Days since applied, based off the date column, is the single most helpful function a spreadsheet can perform that a notebook can't. Sort by it and your follow-up task list is generated automatically. Don't be tempted to add scoring, weighted fit percentages or a colour-coded funnel chart in week one. Those are projects that seem like job-hunting without actually being job-hunting.
4. Decide how rows get created
This is the step people skip, and it is the one that determines whether the sheet survives. Copy-pasting four fields per application is about a minute of work. At two hundred applications that is three hours of retyping, spread across exactly the moments when your patience is lowest.
Free Google Sheets template: make your own copy
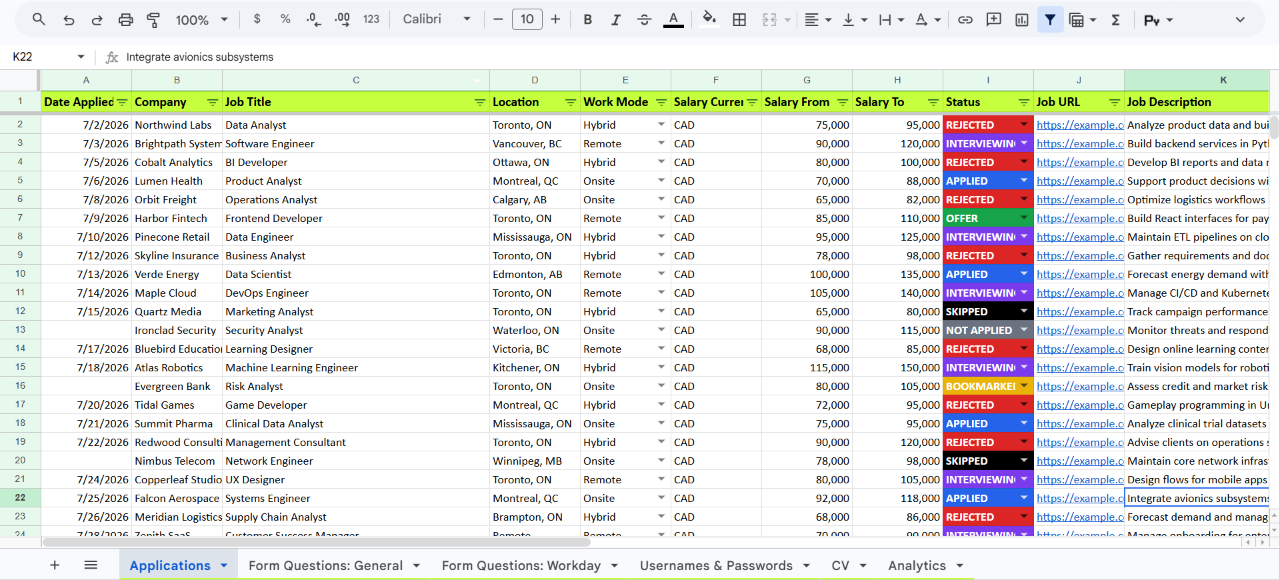
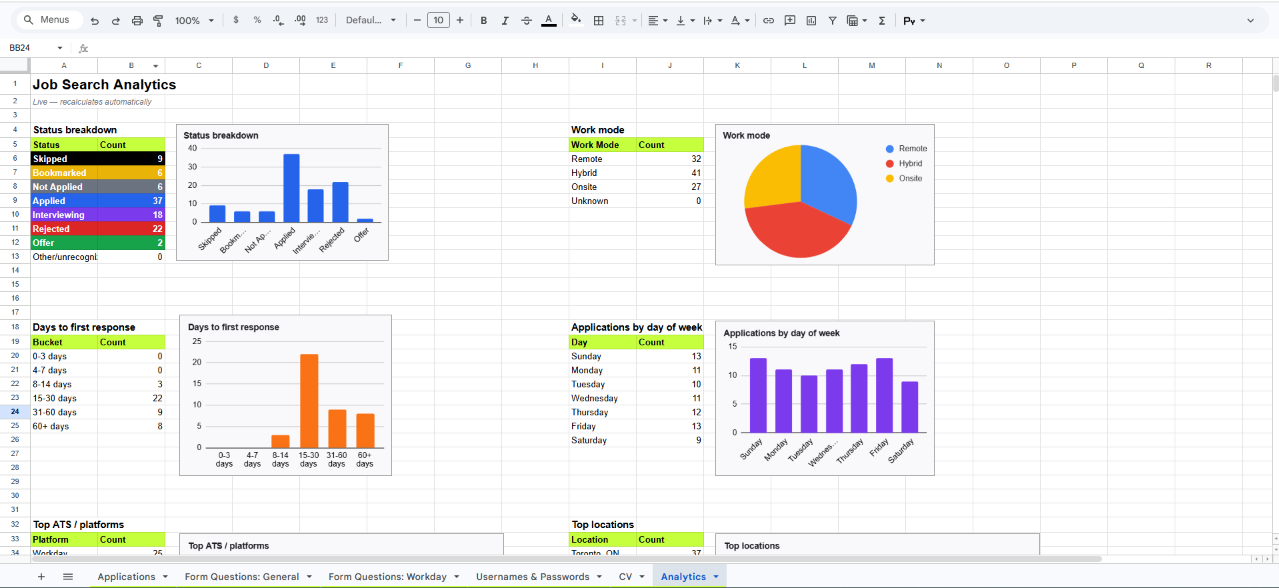
This is the same spreadsheet that the Job Application Tracker Google Sheets extension will generate for you: the 16-column Applications tab and an Analytics tab that computes from it. Make a copy of it, and you can fill it out manually or have the extension do it for you.
 Make a copy in Google Sheets
  Excel version (.xlsx)
How to use it
- Head to Make a copy in Google Sheets. If you're not already signed in to Google, you'll be prompted to do so. Your copy will be created in your Drive and hidden from everyone else.
- On the Applications tab, enter one row for each job. Select Status from the dropdown menu and record dates in the
yyyy-mm-ddformat. - Click Analytics. With everything here being a formula, there's no need to update anything manually.
What is inside
- Applications: the 16 columns, a frozen lime header, dropdowns for Status and Work Mode, a colour for each status, and number formats for salary.
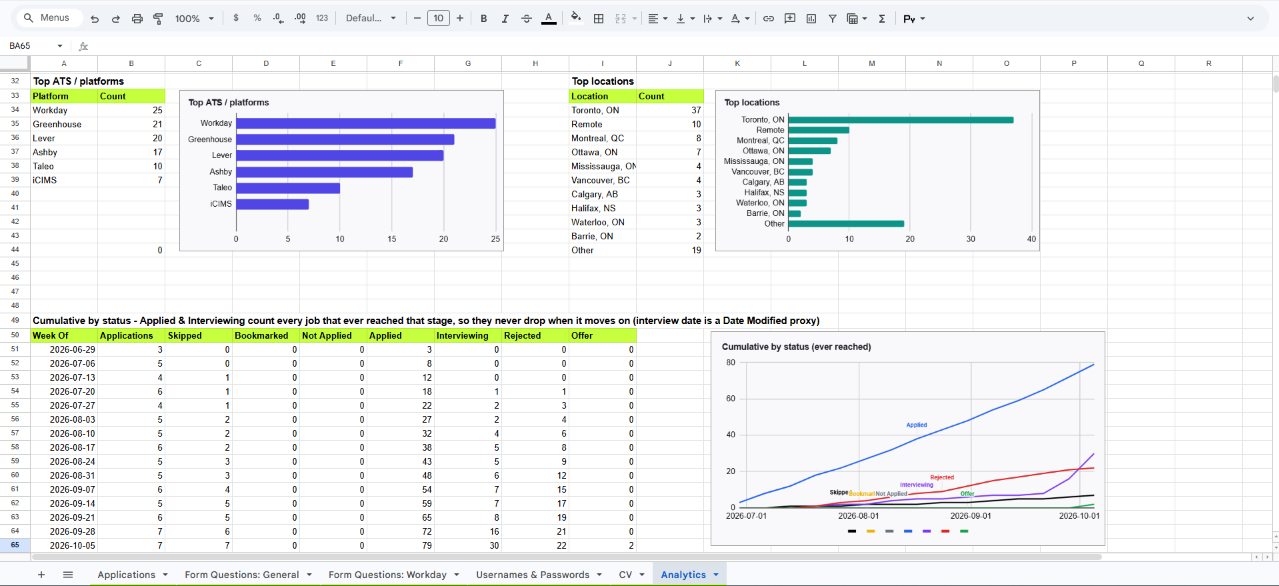
- Analytics: status breakdown, mode of work, time to first response, applications by day of week, top platforms used to apply, top locations, applications by week, and a cumulative-by-status chart. The helper columns are hidden.
The extension will also create a tab for your saved autofill answers on installation, which isn't present in this template. The Excel version has the Applications tab and the same set of eight Analytics charts. All formulas are designed to work in Excel, using a Helpers tab rather than hidden columns; the two weekly charts represent the last 26 weeks.
Build it yourself in Google Sheets
Do you want to see how it works, or build it yourself? All of this is what the extension writes into a new spreadsheet.
Applications: dropdowns and colours
- On an
Applicationstab, enter the 16 headers from the table above into row 1. - Select
I2:I2000, choose Data → Data validation → Add rule → Dropdown, and add the seven values in upper case:SKIPPED,BOOKMARKED,NOT APPLIED,APPLIED,INTERVIEWING,REJECTED,OFFER. Choose Show a warning instead of rejecting input. - Repeat on
E2:E2000withRemote,Hybrid,Onsite,Unknown. FormatG2:H2000as#,##0. - Choose
I2:I2000, Format → Conditional formatting, and add one rule per status: Text is exactly the value, bold white font, and these fills:
SKIPPED #000000 BOOKMARKED #EAB308 NOT APPLIED #6B7280 APPLIED #2563EB INTERVIEWING #7C3AED OFFER #16A34A REJECTED #DC2626
Freeze row 1 and shade it #C6FF3D in bold to match.
Highlight rows that need a follow-up (optional)
This one is just an extra that isn't on the extension sheet. Select A2:P2000, add a Custom formula rule with a pale fill:
=AND($I2="APPLIED",$A2<>"",TODAY()-$A2>=14)A row that remains at APPLIED for fourteen days after you applied will highlight. You can adjust 14 to any waiting period you prefer.
Analytics: name the ranges
Create them by navigating to Data → Named ranges so all your formulas read clearly:
| Name | Range |
|---|---|
AppDate | Applications!A2:A5000 |
AppCompany | Applications!B2:B5000 |
AppLocation | Applications!D2:D5000 |
AppWorkMode | Applications!E2:E5000 |
AppStatus | Applications!I2:I5000 |
AppUrl | Applications!J2:J5000 |
AppModified | Applications!M2:M5000 |
AppInterviews | Applications!O2:O5000 |
Analytics: helper columns
Create a tab named Analytics. These helper formulas sit in columns T to AA (the extension hides them). Each one is a single array formula in row 2 that fills the whole column:
T1:AA1 (headers): Domain, WeekApplied, WeekInterviewed, Responded, DaysToResponse, WeekdayIfSubmitted, WeekLogged, WeekModified

T2  Domain:
=ARRAYFORMULA(IF(AppUrl="","",IFERROR(REGEXEXTRACT(SUBSTITUTE(SUBSTITUTE(LOWER(AppUrl),"https://",""),"http://",""),"^(?:www\.)?([^/?#]+)"),"")))

U2  WeekApplied (Monday of the week, for jobs at Applied or beyond):
=ARRAYFORMULA(IF((AppDate<>"")*REGEXMATCH(UPPER(TRIM(AppStatus&"")),"^(APPLIED|INTERVIEWING|REJECTED|OFFER)$"),AppDate-WEEKDAY(AppDate,3),""))

W2  Responded (1 if it reached Interviewing, Rejected or Offer):
=ARRAYFORMULA(IF((AppDate<>"")*(AppModified<>"")*REGEXMATCH(UPPER(TRIM(AppStatus&"")),"^(INTERVIEWING|REJECTED|OFFER)$")*((AppModified-AppDate)>=0),1,0))

X2  DaysToResponse:
=ARRAYFORMULA(IF(W2:W5000=1,AppModified-AppDate,""))

Y2  WeekdayIfSubmitted (1 = Sunday ... 7 = Saturday):
=ARRAYFORMULA(IF((AppDate<>"")*REGEXMATCH(UPPER(TRIM(AppStatus&"")),"^(APPLIED|INTERVIEWING|REJECTED|OFFER)$"),WEEKDAY(AppDate),""))

Z2  WeekLogged:
=ARRAYFORMULA(IFERROR(IF(AppDate<>"",AppDate-WEEKDAY(AppDate,3),""),""))
A row only records its current state, not its history, so Date Modified stands in for the reply date. Response times are accurate if you update a row on the day the reply is received, and drift if you update it later. Consider response times estimates.
Analytics: the tables
Status breakdown, B6 filled down to B12 (A6:A12 hold Skipped, Bookmarked, Not Applied,
Applied, Interviewing, Rejected, Offer):
=COUNTIF(AppStatus,A6)
A13 "Other/unrecognized", B13:
=COUNTA(AppStatus)-SUM(B6:B12)

Work mode, J6 to J8 for Remote, Hybrid, Onsite, then Unknown in J9:
=COUNTIF(AppWorkMode,"Remote")
=COUNTA(AppCompany)-J6-J7-J8

Days to first response (buckets 0-3, 4-7, 8-14, 15-30, 31-60, 60+):
=COUNTIFS(X2:X5000,">=0",X2:X5000,"<=3")
=COUNTIFS(X2:X5000,">=61")

Applications by day of week (1 = Sunday ... 7 = Saturday):
=COUNTIF(Y2:Y5000,2)

Applications per week: the list of weeks, then a count per week:
A51: =SORT(UNIQUE(IFERROR(FILTER({Z2:Z5000;AA2:AA5000},{Z2:Z5000;AA2:AA5000}<>""),"")))
B51: =ARRAYFORMULA(IF($A51:$A300="","",COUNTIF(U2:U5000,$A51:$A300)))
The top-platforms and top-locations tables require a longer formula (a lookup of application systems, and cleaning up free-text locations like "Toronto, Ontario, Canada" into "Toronto, ON"). The simplest way to get them is to copy the template above.
Manual, template, or automatic
| Approach | What it costs per application | Where it breaks |
|---|---|---|
| Plain spreadsheet, hand typed | Around a minute's worth of copy and paste | Volume. The sheet gradually goes out of date and you no longer believe it. |
| Downloaded template with formulas | The very same minute, together with setup | Same place. More lovely formulas do not fill in on their own. |
| The tracker that's part of a job board | Nothing, only on that one board | Everything you applied to anywhere else, which is most of what you clicked on. |
| Browser extension writing to your own sheet | Nothing after setup, and saved form answers sync through your own Google Sheet — the same answers are there whether you are on Chrome at home or Edge on a work laptop | Sites it does not recognise, where a generic fallback still logs the basics. |
Common mistakes
- No URL column. The posting gets pulled, the recruiter asks which role, and you're recreating it from a job title you think you remember. Save the URL with the row.
- Company names spelled three ways. "Acme", "Acme Inc." and "ACME Corp" are three different rows to a filter and one employer to you. Pick the form the posting used and stick to it.
- Logging the date you discovered it, not the date you applied. All your subsequent calculations are off by however long it sat in your tabs.
- A notes column that becomes a journal. If the note is wider than the row, it belongs somewhere else. Remember, notes are for the referral name and the promise you made, not the story.
- One sheet a month (or per type of job). Divide the record and you lose the one thing this sheet is best for: have I already applied here? Filter one sheet instead.
- Backfilling from memory on Sunday. The row you write four days later is missing the salary, the link and the exact title. Those were the bits you would have kept.
The part that decides whether it survives
A tracker template isn't a design problem. All the layouts shared here can be put together in less than an hour each, and the sixteen columns above will support nearly everyone. What separates the sheet you're still using in month three from the one you've abandoned is whether a row appears without you sitting down to create it. The rest is formatting.
Why this site exists. Job Application Tracker for Google Sheets is a browser extension that does the admin described above: it records every application you submit into a spreadsheet in your own Google Drive (and pre-fills the exact sixteen columns above for each submission), displays a Status badge on postings you have viewed previously, and auto-fills repeat fields on supported application forms from your previously saved answers, without any AI assistance. It supports Chrome, Firefox, and Edge.
Frequently asked questions
What should a job application tracker spreadsheet include?
Company, job title, link to the posting, location, salary as posted, date applied, status, and a one-line notes field. That covers the four questions a tracker actually gets used for: whether you already applied, what exactly you applied for, who has gone quiet, and whether the search is working. Anything beyond those columns tends to be the first thing you stop filling in.
Is a Google Sheets job application tracker better than Excel or Notion?
For most people, yes, for one practical reason: it is reachable from any browser and easy to share a filtered view of with someone helping you, without emailing versions around. The format matters much less than whether the rows stay current. A shared Google Sheet you keep updated beats a more powerful tool you abandon in week three.
How do I stop forgetting to update my tracker?
Remove the step where you have to remember. The failure is not laziness, it is that data entry is charged at the exact moment you are most tired of the application you just finished. Either log the row before you close the tab, as a fixed habit, or use something that writes the row when you submit, so the record does not depend on discipline at all.
How many applications should a tracker be able to handle?
More than you expect. A focused search can run to a few dozen, but a broad one in a slow market often passes two hundred, and that is precisely where hand-typed trackers fall apart. Design for the volume you might end up at rather than the volume you are at in week one.